
Becoming an artist on Spotify is not hard at all and if you are a singer you can join Spotify as an artist and become a verified artist on Spotify.
You can also publish your songs and albums from it and inform your fans about your concerts and festivals date by picking them on your Spotify profile.
Spotify artists revenue per stream in every country is different and in Spotify ads, you can promote your songs in countries that have a higher PPC and increase your Spotify stream on those countries. ( Spotify premium price in every county is also different)
Promoting your songs by creating Spotify playlists and pitch your songs on them is another feature of the Spotify artist page.
Canvas is another opportunity for artist to promote their artworks better on the internet.
In this article, you will find:
- How to Become an Artist on Spotify
- How to Become a Verified Artist on Spotify
- Spotify Artist Profile
- Adding Your Artist Images
- Avatar images
- Header Image
- Writing Your Bio
- Artist Pick
- Add an Artist Fundraising Pick
- Artist
- Charity
- Adding Your Artist Images
- Merchbar For Spotify Artists
- Spotify Artist Playlist
- Release Music on Spotify
- How to Upload Music on Spotify
- Do Spotify Artists Get Paid
- Promote Your Music on Spotify
- Get Your Music on Spotify Playlists
- Use Canvas on Spotify To Be More Creative
How to Become an Artist on Spotify
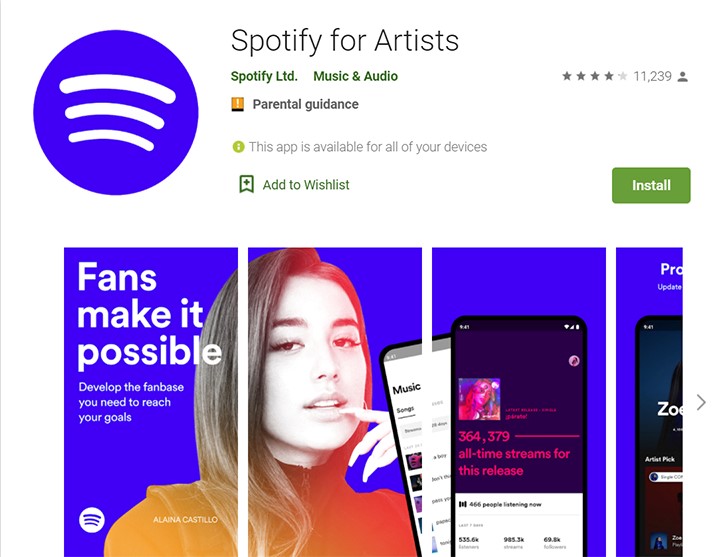
It should be one of your top priorities as an artist to build relationships with your current and potential fans. Spotify’s artist page offers creative tools that can assist you in this endeavour.
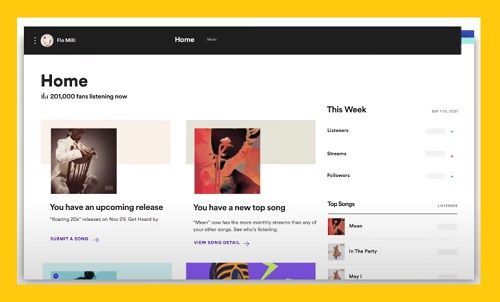
Currently, these services are available on iOS, PC, and Android in the English language, but Spotify wants to provide these services in additional languages.
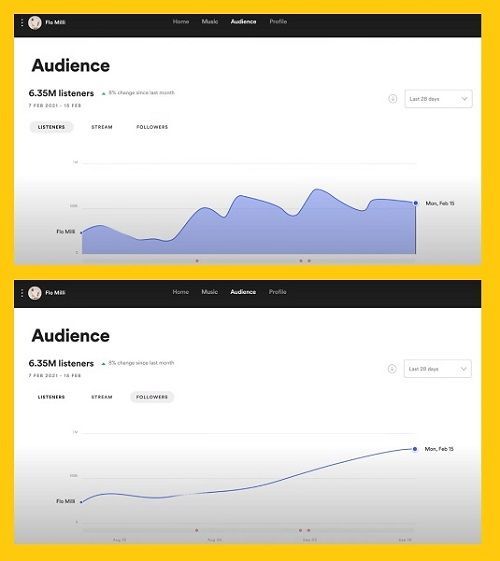
As an artist, if you have not registered on Spotify Artist yet, we recommend you go to the artist Spotify page and register on it and claim your artist account, after that you can have a blue tick on your profile then you can use all of the features that we will mention in this article.
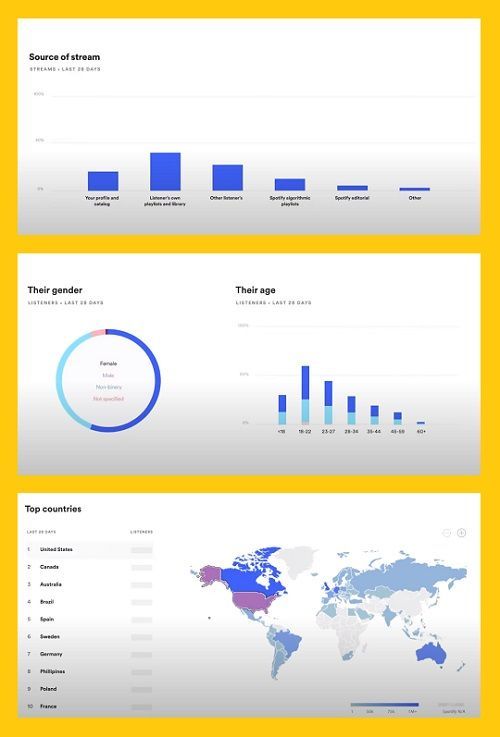
Creating an artist account on Spotify requires a regular Spotify account, so if you don’t have one, sign up for one on the Spotify website.
How much Does it Cost to be an Artist on Spotify?
There are no fees or commissions charged by Spotify to artists, regardless of how frequently they release music.
You can become an artist on Spotify in three ways:
- The first way is that you can claim yourself as an artist. You need to share some of your personal information and verify them using the artist’s social channels. The Spotify team review your request and send you the result. You need to wait for two weeks for verification process after you release your work. Once your work is released, they need to fully process and recognize it in their system in order to verify your artist page.
- The second way to become an artist on Spotify is using an invitation. Ask one of the members of your team that has access to Spotify for the artist platform in order to send you an invitation.
- The last option you have is choosing a distributor. If you work with a distributor, you will automatically get access to become an artist on Spotify.
If you want to become a verified artist without a distributor or asking your artist friends to invite you as an artist on platform you should follow these steps:
How to Become a Verified Artist on Spotify
Being a verified artist with a blue tick can provide you with many benefits. you can take advantage of all the features which provides for artists in order to enhance their careers. In the following, we will discuss it.
Verified artists have a blue tick on their profile. To become a verified artist, you must prove to company that you are an artist. To do so, you should follow these steps:
Login to Your Spotify Artist Account
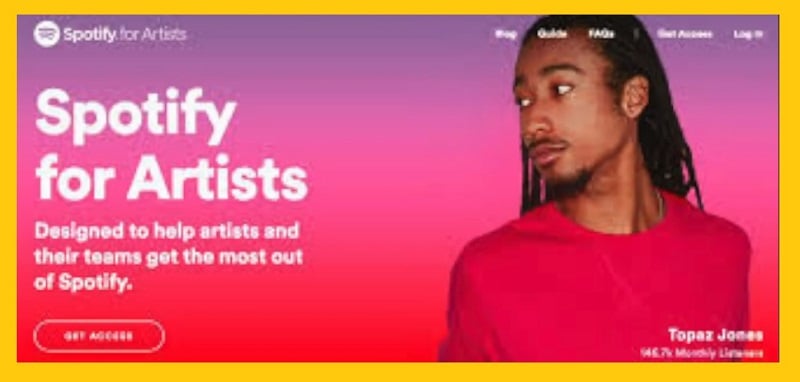
1- Go to the Spotify for Artist Site.
2- Click on ” Get Access”.
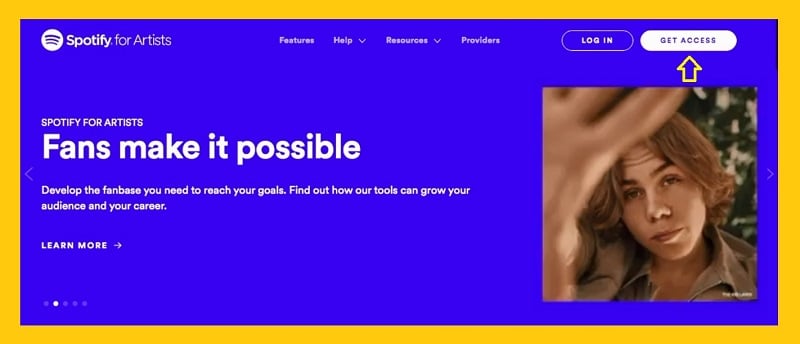
Now you can get access to your profile.
Prove for the Company That You are an Artist
Here you should prove for the company that you are an artist or manager, or a Label team member.
If you are an artist you should click on “Artist or Manager”.
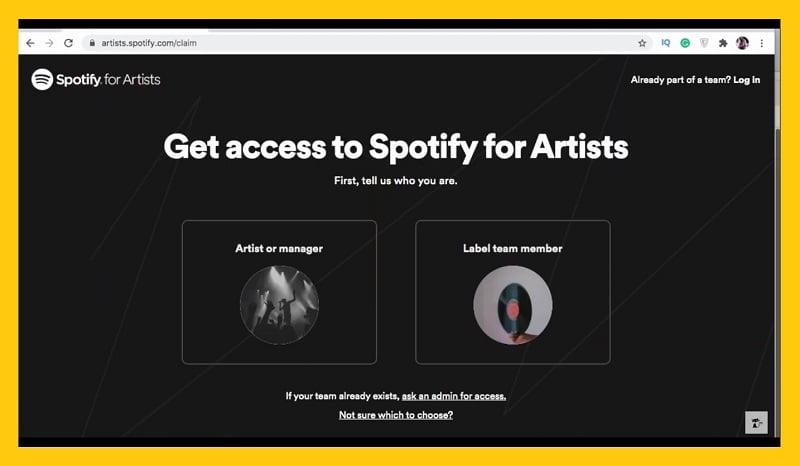
1- In this part, Spotify asks you to log in to your account.
You should pay attention to this point that for having a artist profile, you must have a regular account first, If you do not have it yet, you can sign up for a Spotify account first.
To conclude Spotify have two different kinds of accounts:
- the first one is a Regular Spotify account,
- the second one is artist account.
these two different accounts will be linked by Spotify together.
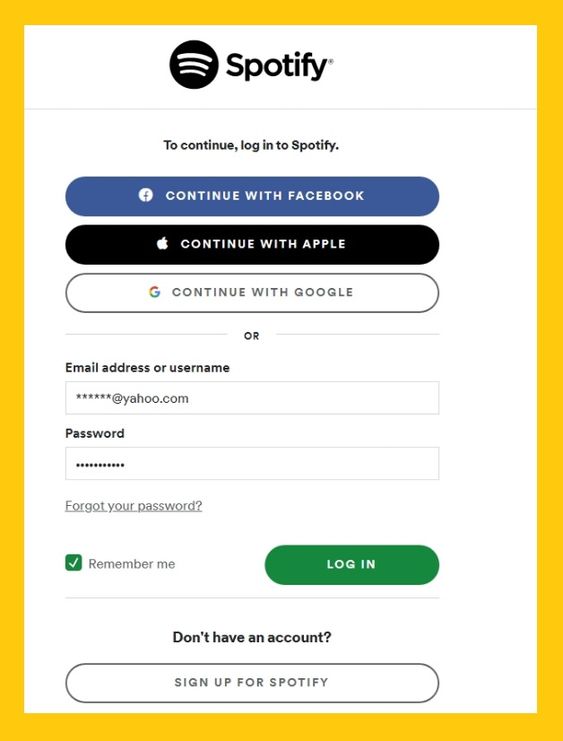
- Here you should login to your regular account, for that you can use your Facebook or Gmail or Email account and for iPhone devices you can use your Apple Id.
Claim Your Artist Profile
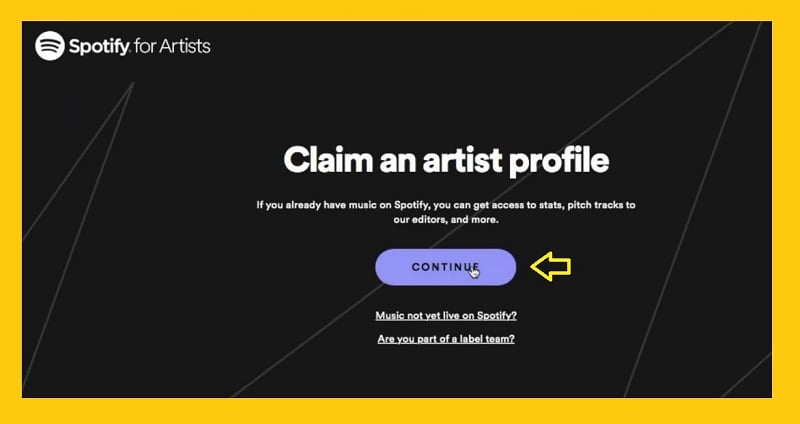
- After you entered to your normal account, you can claim your artist profile, Click on Continue.
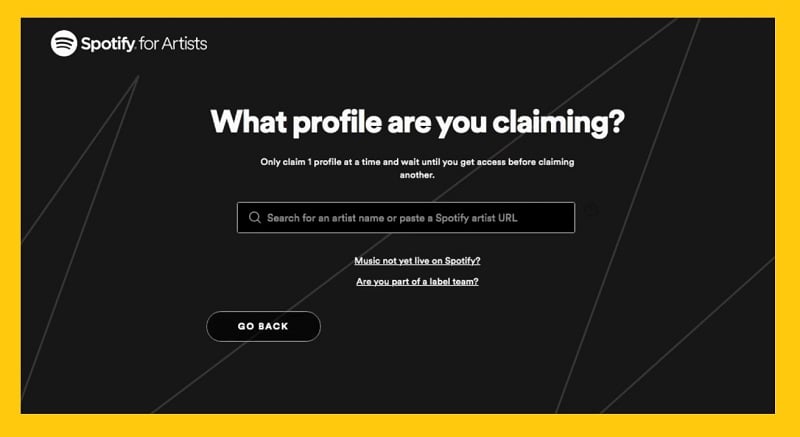
Here Spotify asks you about the profile that you are claiming. Here you should write the name of the profile that you want to claim is your profile.
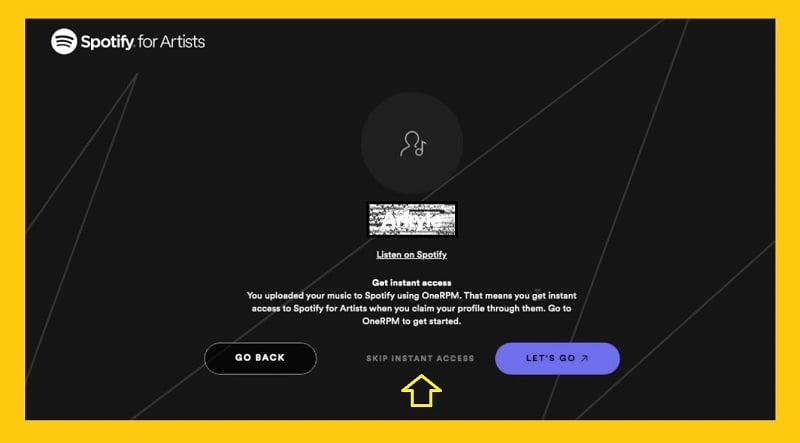
- In this part, click on “Skip Instant Access”, because “not every music distributor is set up to allow you to claim your artist profile through links that they provide.
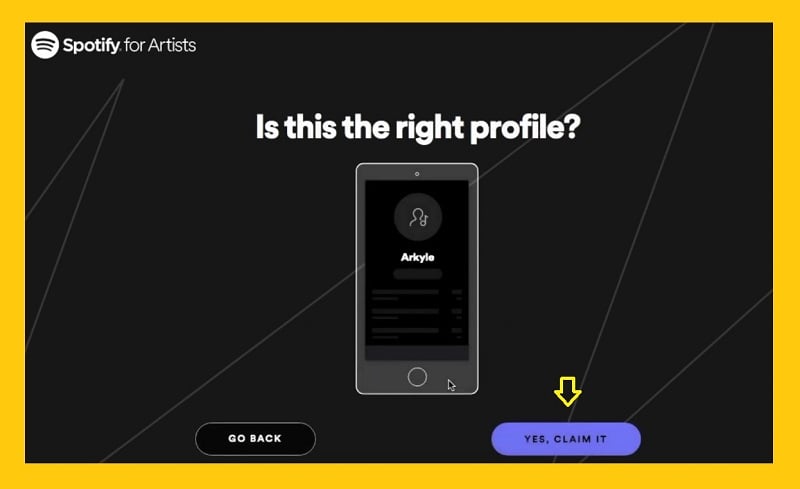
- Click on “Yes Claim it”.
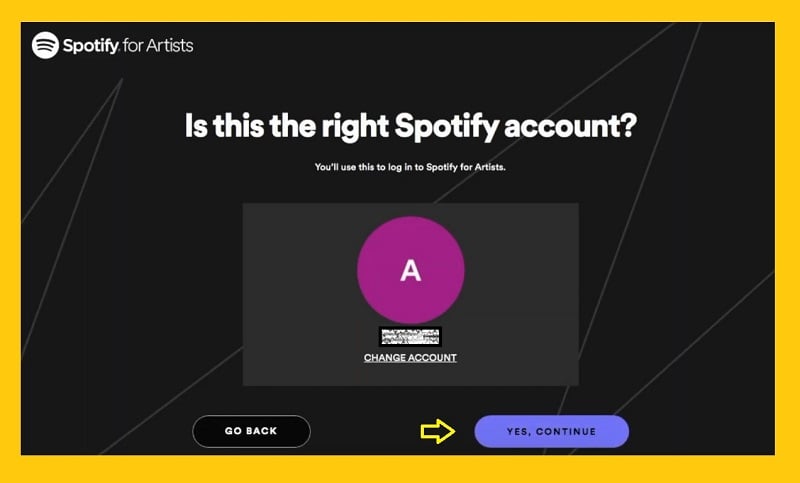
- Click on “Yes Continue”.
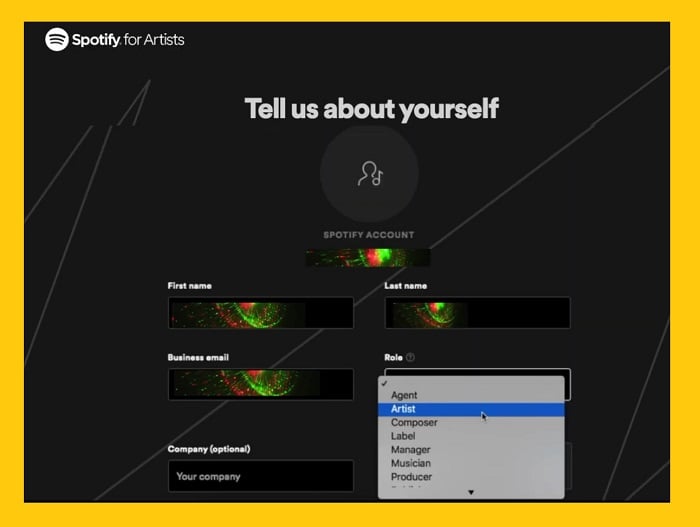
Fill out Your Data
Here you should fill out the form. ( In the Role part, you should select Artist).
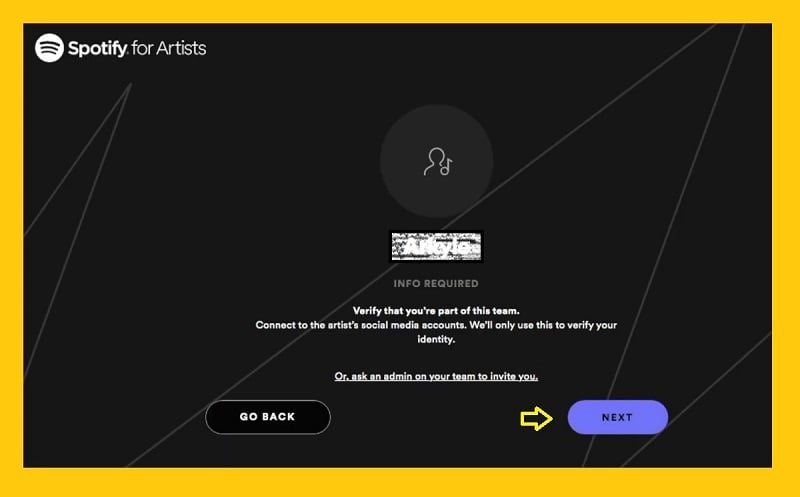
Here platform asks you to connect to your social media accounts to verify that you are an artist.
- Click on “Next”.
Connect Your Account to Your Social Media
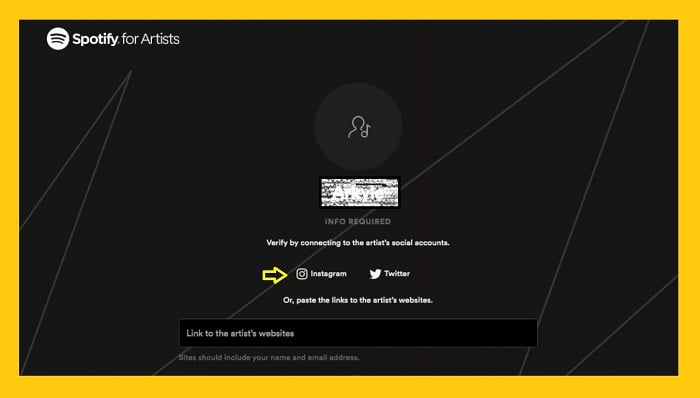
Here you can choose your Instagram or Twitter account or write the address of the website.
we selected the Instagram option, For that, you should follow these steps:
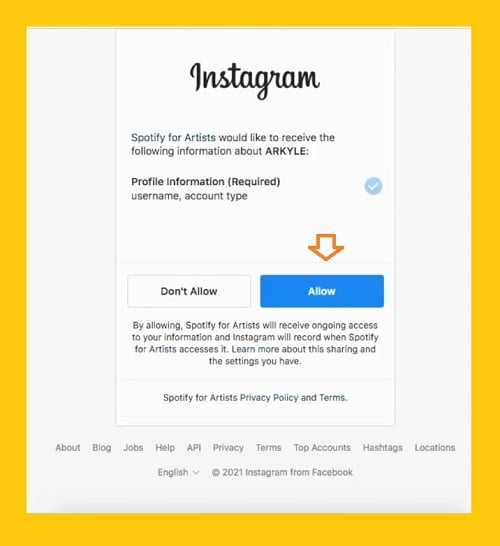
Allow to Instagram send your information to Spotify for Artists.
- Click on “Submit”.
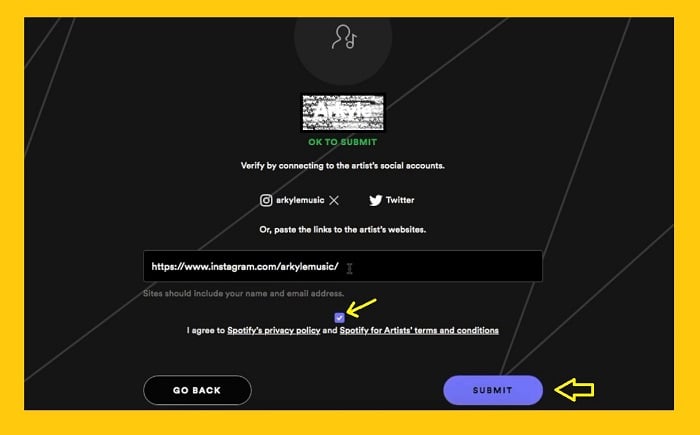
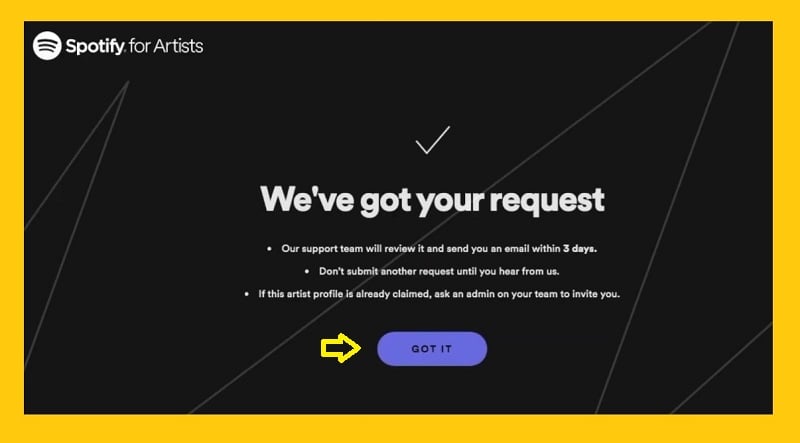
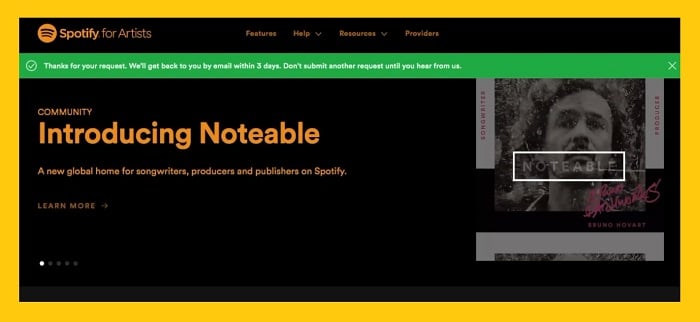
Here you should wait for 3 days, company will check your identity as an artist and send you an email.
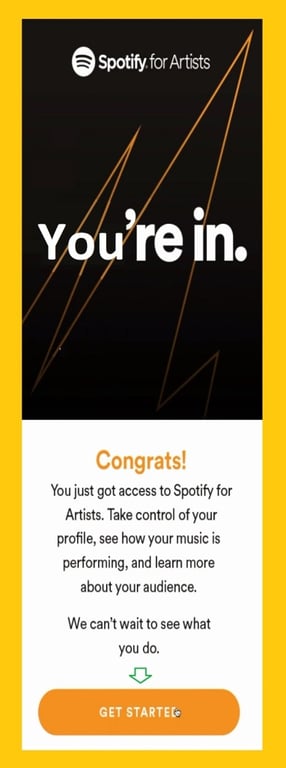
After 3 days we received this Email from Spotify.
- Click on “Get Started”.
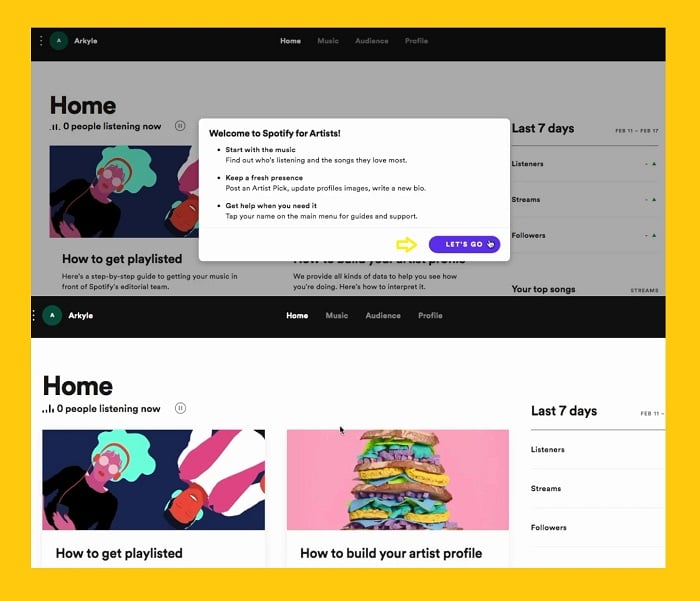
- Now you are at your Artist page.
For more information, you may want to check out this YouTube clip, it can be helpful for you. I gained a lot from watching it.
How to Manage Spotify Artist Profile
After registering on the website and getting your artist profile with a blue verification tick. you can use all of the facilities which Spotify provides for artists.
We recommend you start with your profile, as an artist, it is crucial for you to introduce yourself to your fans professionally, platform provides you with some facilities in your profile to make it easier. we want to start with them.
Your artist profile should be important for you because it is your home page and your fans can find more about your personality and also you will save your songs on it. For creating and designing your profile you should follow these steps:
Adding Your Artist Images
There are two different images here:
1- Avatar images: This feature will be shown in the search result and in the Spotify mobile app.
For changing avatar image on the web browser you should follow these steps:
- Go to Profile.
- Click the pencil icon in the top-right.
- Under Avatar image, click UPDATE.
For mobile app you should follow the below steps:
- Tap the profile icon in the bottom-right and then click on EDIT IMAGE.
- Choose your desired Images from the album.
- Click on the Save button.
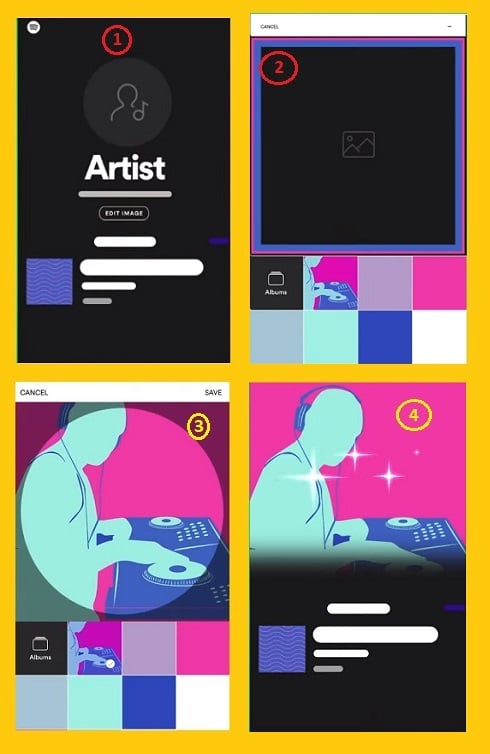
Note: You can’t remove your avatar image, but you can edit it.
It normally takes 24 – 72 hours for your search image to update. If it doesn’t update after 72 hours, restart the Spotify app a few times (it could be a caching issue).
2- Header Image:
This picture will be shown on the top of your profile picture in the Spotify desktop app.
For changing this picture you should follow these steps:
- Log in to artist Spotify and then Go to Profile.
- Click the pencil icon in the top-right.
- Under Header image, click UPDATE.
Writing Your Bio
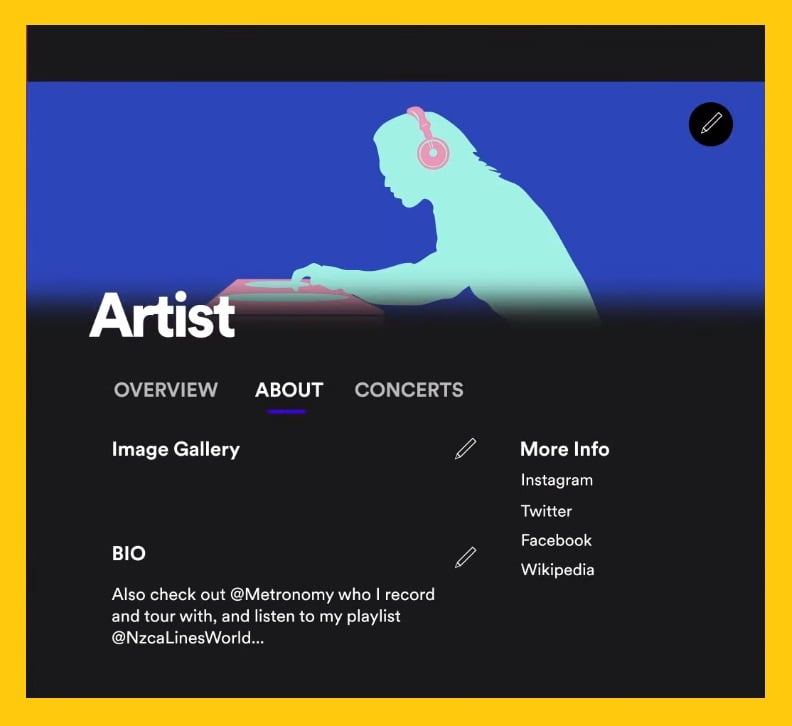
This part is a place that your fans can know more about you and your works, In this place, you can write a story and explain more about yourself and also you can write about your inspiration behind your latest songs and link your social media platform with your artist platform by putting your Instagram, Twitter, Facebook, and Wikipedia links.
It can help you to connect all of them together and attract more people to your artist page.
When you are writing your bio we recommend you pay attention to these points:
- Your text should be less than 1500 characters.
- You can use @tags to link to artists, albums, playlist and tracks on Spotify.
- Paste Spotify links in the text field.
- Add links to your social media, Wikipedia, and your Sound Better profile.
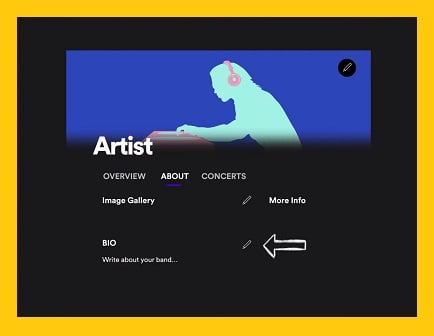
For Editing your Bio, in the Web player:
- Click on the About tab.
- Click on the Pen, in front of the BIO.
- Write about your self and the inspiration behind your songs here.
- You can also add your Wikipedia link and other social media platform links here.
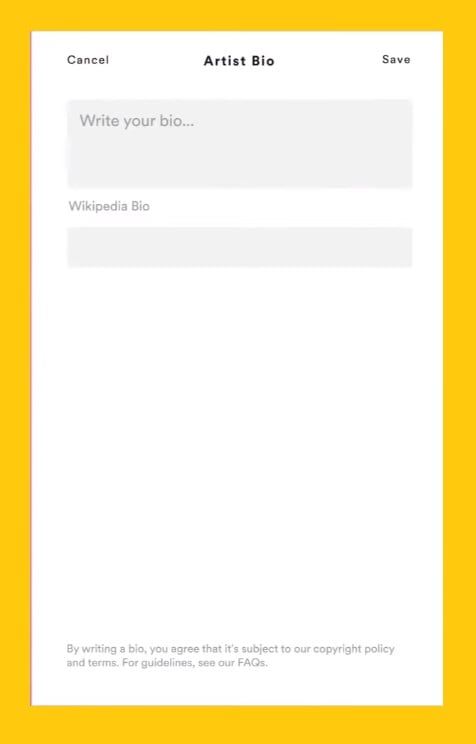
- Click on the Save button.
In the mobile app you should follow these steps:
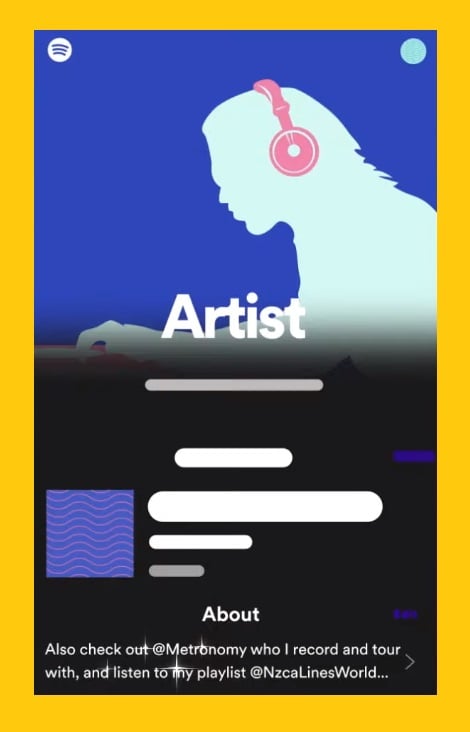
1- In the about part click on the Edit.
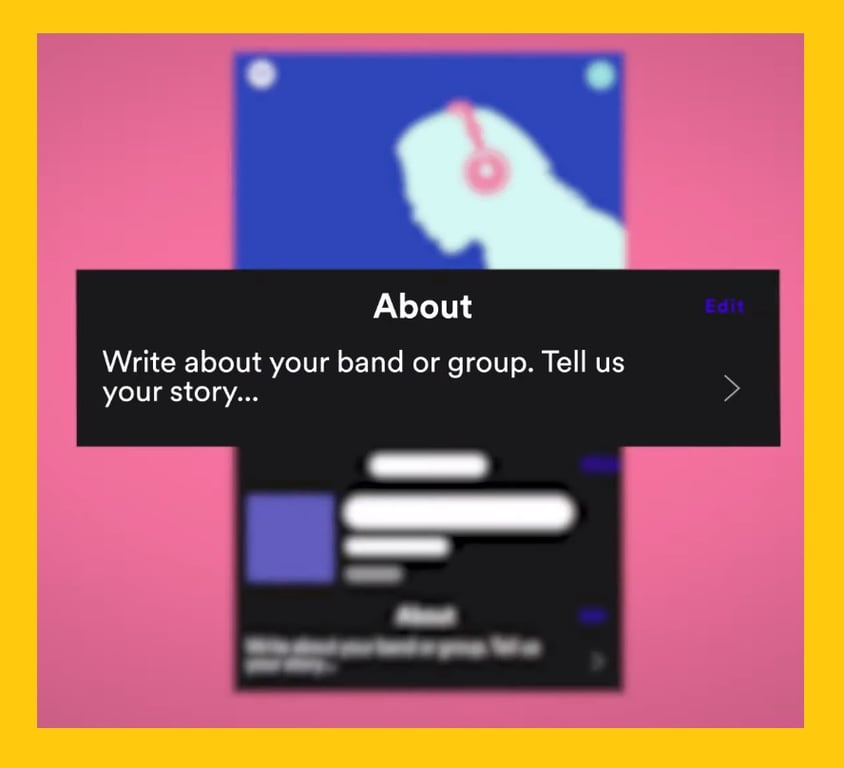
2- Write your desired Bio.
3- Click on the Save button.
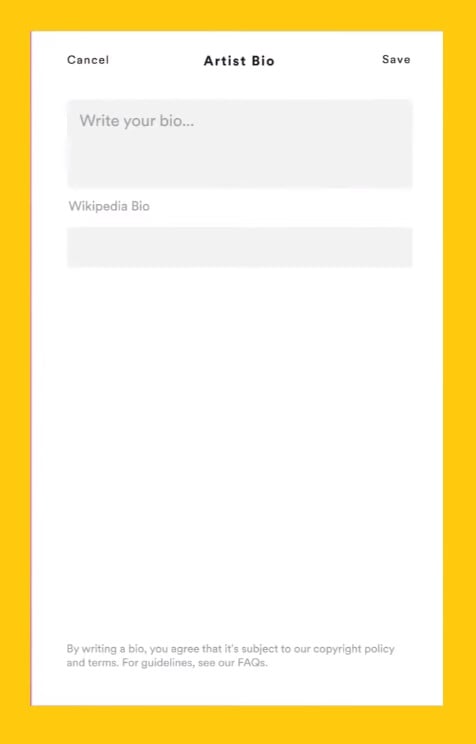
When writing your bio, you should follow these guidelines.
- Behave respectfully and not plagiarize.
- Do not violate anyone’s copyright. it means you must obtain permission before copying anything.
- Hate speech and discrimination of any kind are strictly prohibited and will be removed immediately.
- Spotify does not tolerate bullying, threats of violence, or harassment.
Spotify removes content containing the above immediately
Artist Pick on Spotify Artist Profile
Artist pick is another feature that you can use to interact with your fans.
You can pick your desired music, album, playlist, your concert and podcast shows or individual episodes, and put them at the top of your profile to inform your fans these are your choice and recommend them to your fans too.
You can also add a short text and also upload your desired picture for your pick.
This pick will remain for two weeks on your profile and after that, it will disappear but you can modify it during these 2 weeks, if you pick a show tour it displays until the day after your last show.
Note:
You can not add a podcast on your artist pick in the Spotify for artist mobile app.
For adding pick on the mobile app:
1- Open artist app.
2- Click on the Profile icon on the right below the screen.
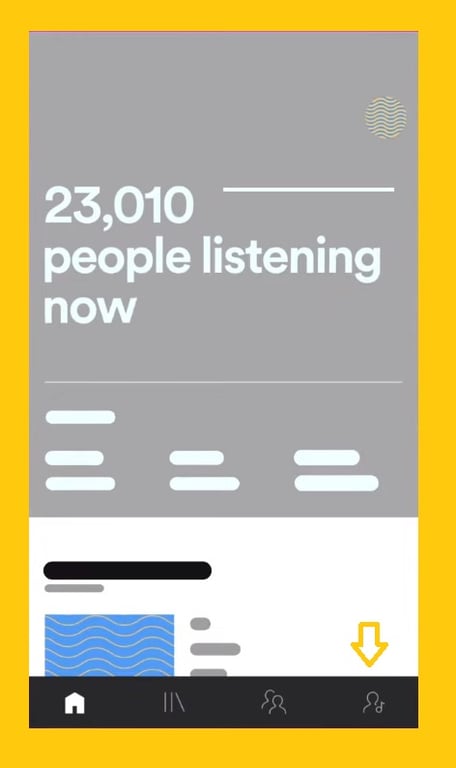
3- Click on the + sign near pick.
4- Choose your desired track, album, concert … which you want to pick it.
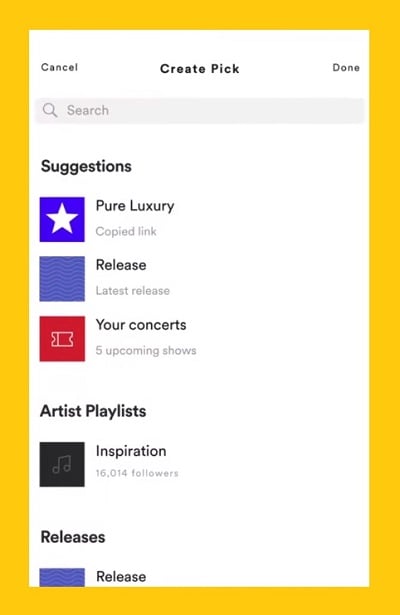
5- Write your desired message for your pick.
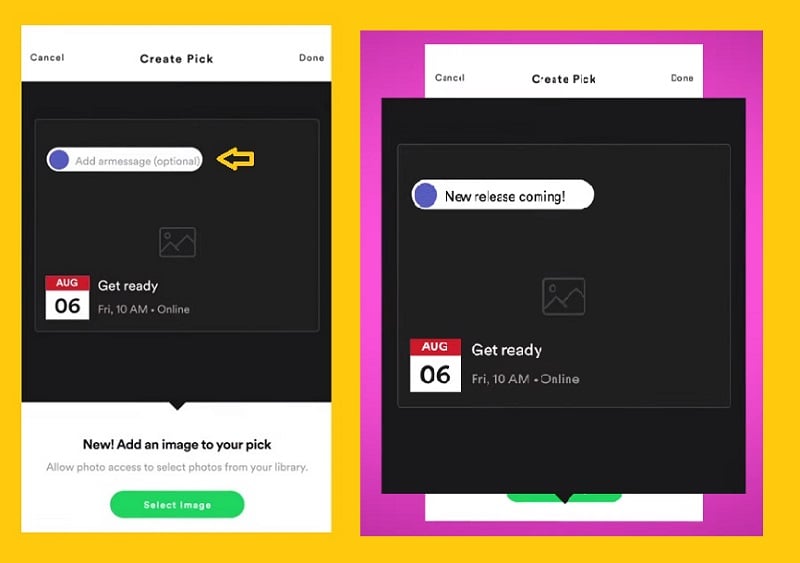
6- Upload your desired image for your pick.
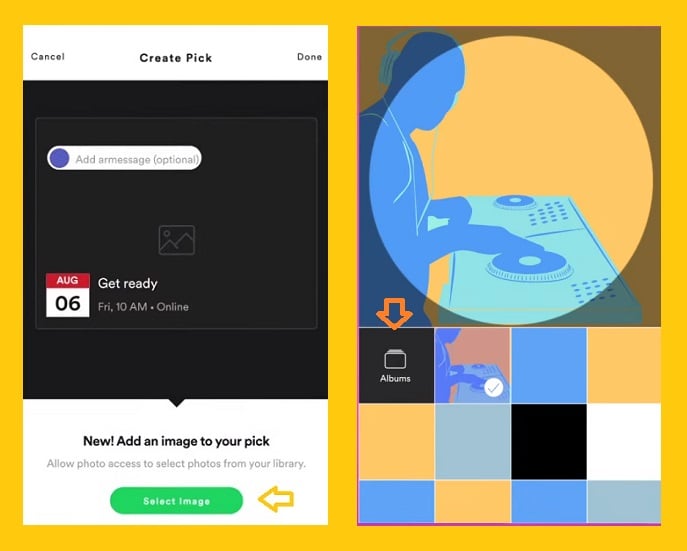
7- Click on the “Done”.
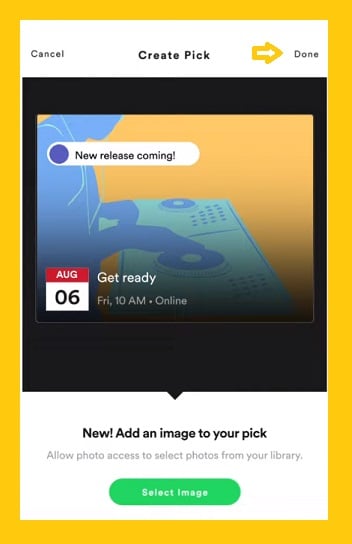
For Adding Pick on Desktop:
1- Click on the Dashboard.
2- Click on the Profile.
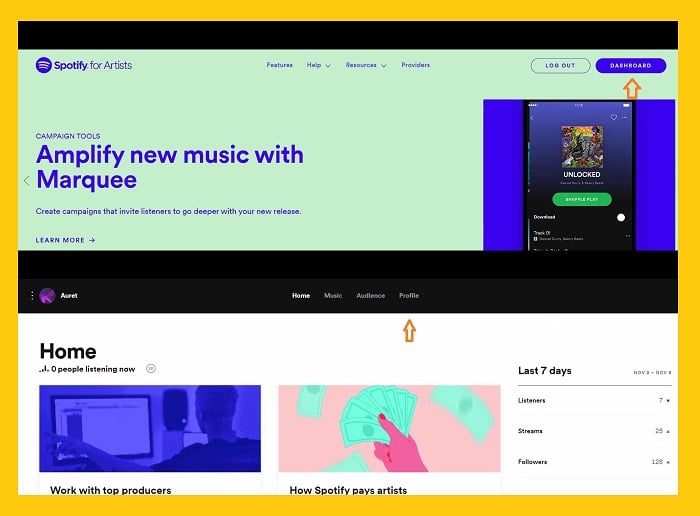
3- Click on the + sign near pick.
4- Choose your desired track, album, concert … which you want to pick it.
5- Write your desired message for your pick.
6- Upload your desired image for your pick.
7- Click on the “Done”.
How to Add an Artist Fundraising Pick on Spotify
A fundraising event is an excellent way to support not only your favourite artists but also to support your chosen charity, especially these days when most of your favourite artists are unable to have their regular live shows and concerts due to the Coronavirus.
You can use Spotify’s fundraising button to ask your fans to help you or the charity you recommend.
Spotify does not receive any money from it, and all the money goes directly to you or your chosen charity.
For adding this button to your Spotify profile you can follow these steps:
Fundraising for yourself:
- Log in to artists.spotify.com.
- Go to Profile.
- Under Artist Fundraising Pick, click + Get support directly from fans.
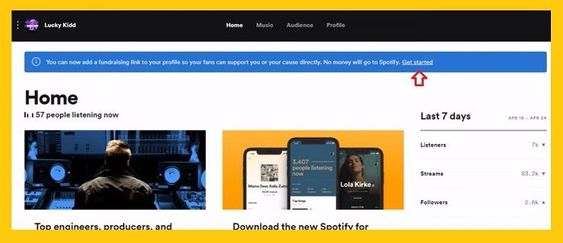
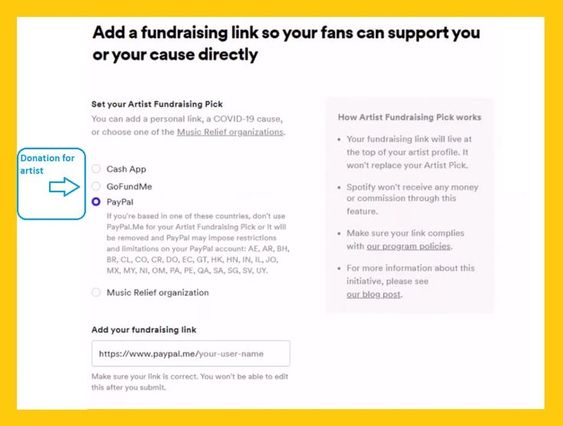
- Choose one of the methods that you have an account on it.
- Insert the link of your account in the box.
Make sure all the information is correct before sending. In that case, you can click on the link you inserted, if that link takes you to your account, you can be sure the link is correct.
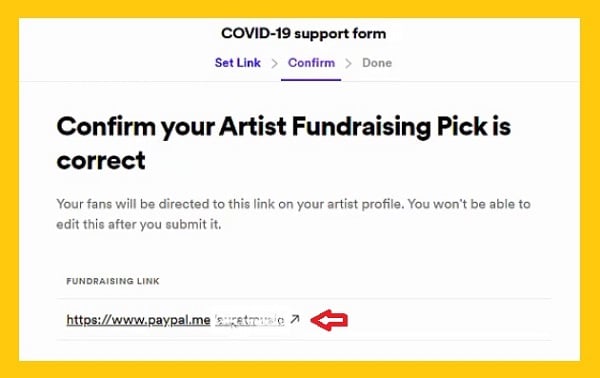
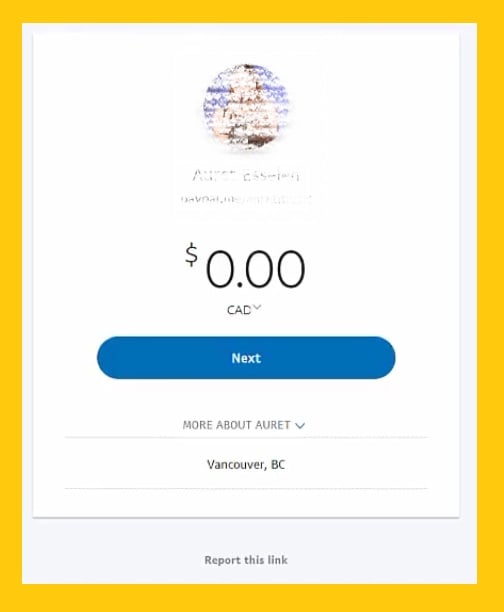
- Click AGREE AND SUBMIT.
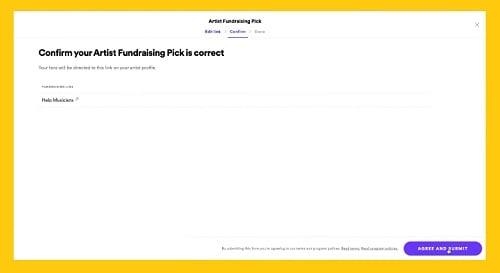
The following steps are what you should follow if you want your fans to help a charity that you recommend:
- Log in to Spotify Artist page.
- Go to Profile.
- Under Artist Fundraising Pick, click + Get support directly from fans.
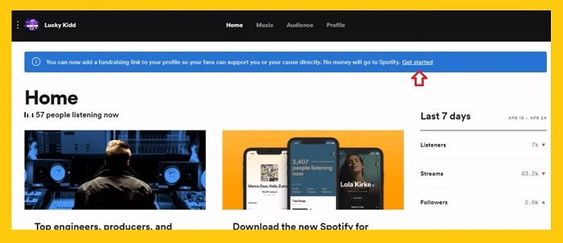
4- Click on the “Music Relief organization”.
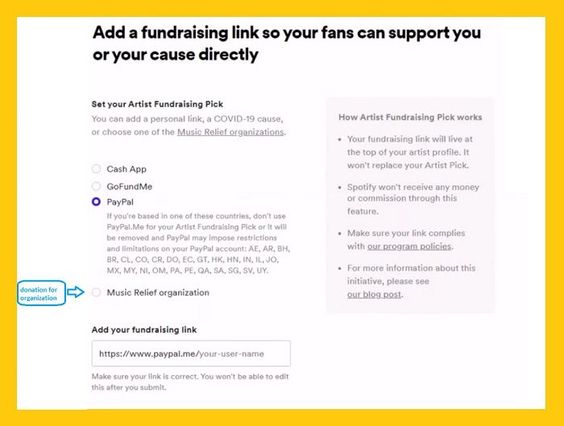
5- Here you can select your desired charity from the list.
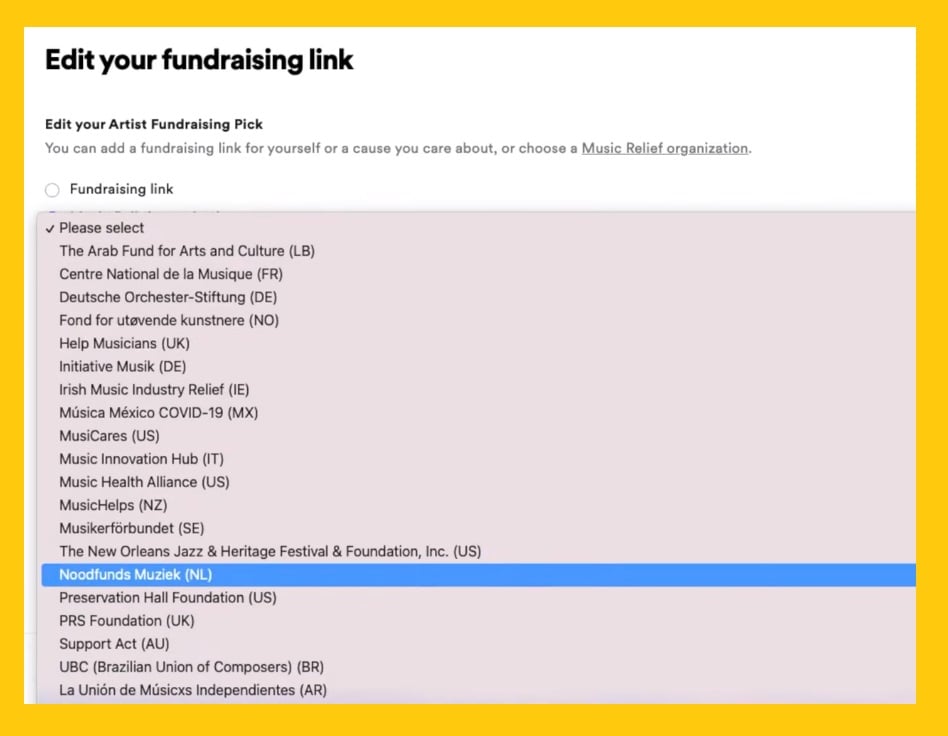
6- Click AGREE AND SUBMIT.
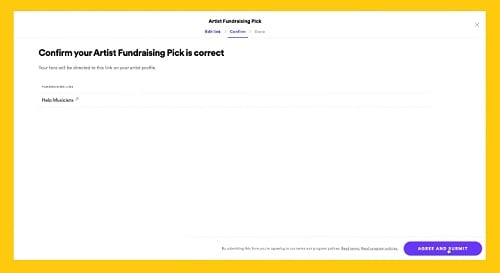
Make sure all the information is correct before sending. In that case, you can click on the link you inserted, if that link takes you to your charity website, you can be sure the link is correct.
Feature an Artist Playlist
Spotify playlists provide artists with an excellent opportunity to introduce their songs to others as well as make it possible for their songs to be detected by Spotify radar so that many people will have a chance to hear these songs.
On Spotify, there are 6 different kinds of playlists:
1- Your Own Playlist.
2- Other people playlists.
3- Collaborative playlists.
4- Branded playlist.
5- Curated Spotify playlist.
6- Algorithmic playlist.
By creating your own playlist and put your and other artists songs that have the same rhythm on them, you can attract more people to listen to your own songs.
For creating your playlist it is better to consider these points:
- The Genre or sub-genre of music.
- Your friend’s band or bands you have touched with.
- Your influences.
- Place of origin like city, state, nation.
- Time, year, etc.
- Instrumentation.
- Theme.
- Lyrical focus.
On the “Spotify Playlist Made Simple: Step by Step Guide” page, you can find comprehensive information about how to create and share a playlist, add songs to it and make a Spotify playlist public or secret.
Listing Concerts and Festivals on Spotify
The concert tab on an artist’s profile is another service Spotify provides for artists to help them become more successful. Spotify helps artists promote their live performances as well as their virtual shows.
Spotify offers this service in the UK and is also taking steps in other countries.
Currently, Spotify has agreements with Ticketmaster, Songkick, Resident Advisor, Eventbrite, AXS,
StageIt, NoCap, Mandolin, nugs.net, Eplus which is only available in Japan, so all your fans will be able to see the date of your concert once your concert is registered on those platforms.
Additionally, Spotify has partnered with Ticketmaster, Songkick, StageIt, NoCap, Mandolin, and nugs.net to add virtual events, which have been on the rise these days, to your artist page after your show is listed on those platforms.
In parallel, your event (live show or virtual show) will be added to Spotify’s email list and Spotify will send an email to the people who are eligible to hear from your event.
As an example, your fans and potential fans who live in a city where a concert is being held will receive a personalized email, and also Spotify will promote your tour date to them.
Additionally, the date of your show will be displayed on your profile until one day after your event is over.
How to List Your Concerts and Festivals on Spotify
You should consider some points for adding your show on Spotify
your concert listing needs to include:
- At least 1 artist name
- Start time
- Venue name
- Event name
Spotify show concerts and send recommendation emails to fans based on where they live, who they follow, and who they listen to.
We recommend you ask your fans to follow you so they know when you’re performing.
Use Spotify for Artists to see how many followers and listeners you have in each city you’re playing.
In the following, we are going to explain:
How to list your concert on Spotify by using the Songkick Platform.
- At first, you should go to the Song kick web.
it is utterly free and you shouldn’t pay any money for registering on this website. - Add yourself as an artist.
- Enter the artist name or your band name.
- Click on search.
- Click on the Start managing after that you should follow the prompts to claim the profile.
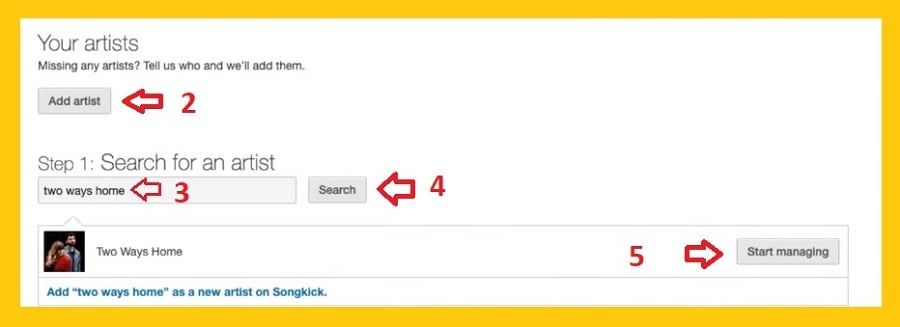
6. After you claim your profile and have access to your own profile, click on Events:
7. Click on Add event,
here you have 3 options you can choose concert, Festival or live Stream.
Here we chose the concert but you can choose other options and the process is approximately similar.
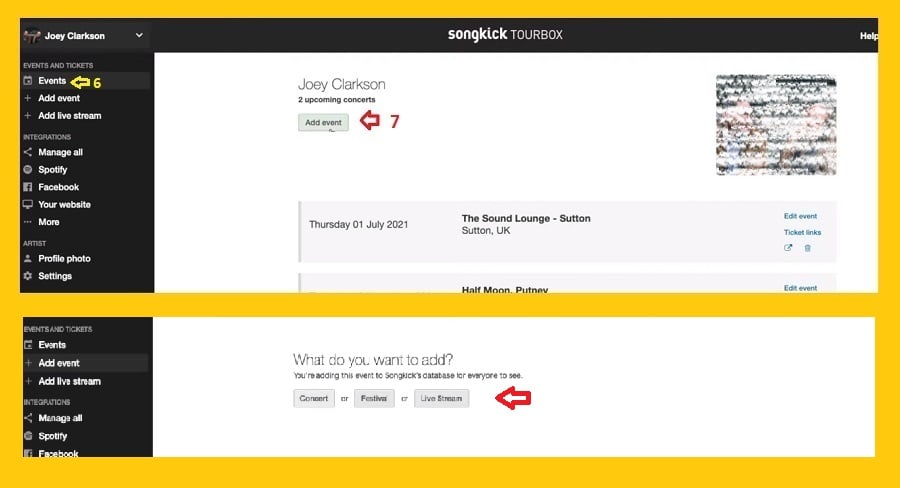
8. Fill the form below, pay attention to this point:
For Spotify this information is crucial, you should fill them in your form.
- At least 1 artist name.
- Start time.
- Venue name.
- Event name.

After you add your event, this event will be automatically connected to your artist account and after 24 hours you can see your concert information on your profile.
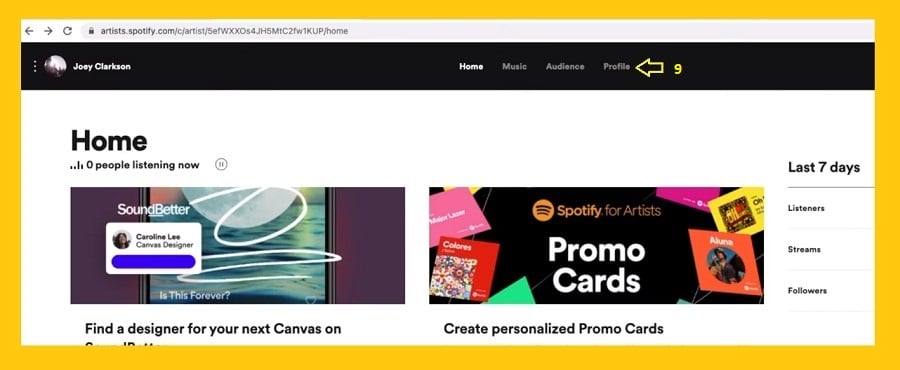
9. For that go to the Spotify artist page and click on the Profile tab.
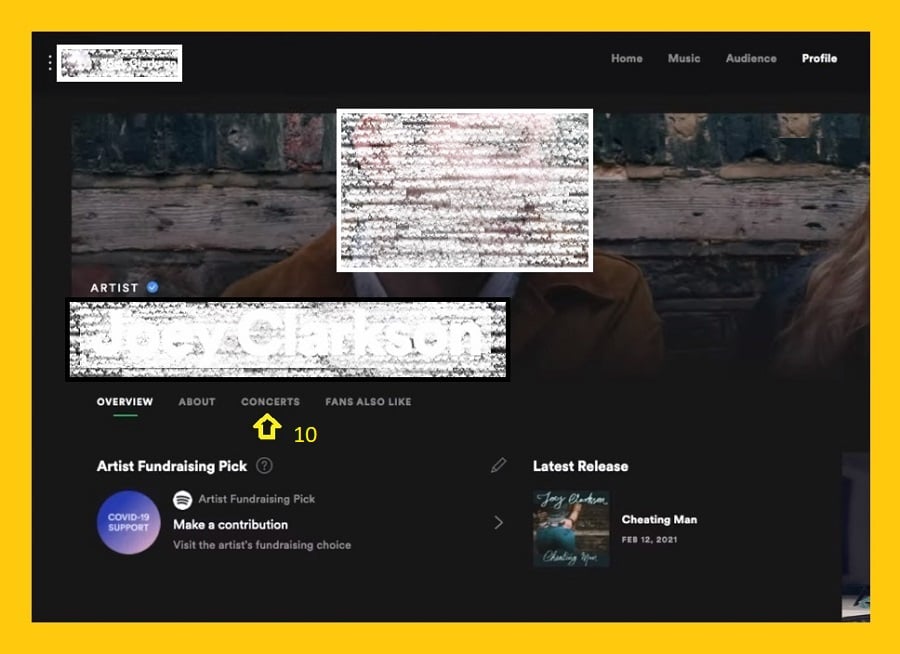
10. Click on the concert tab.
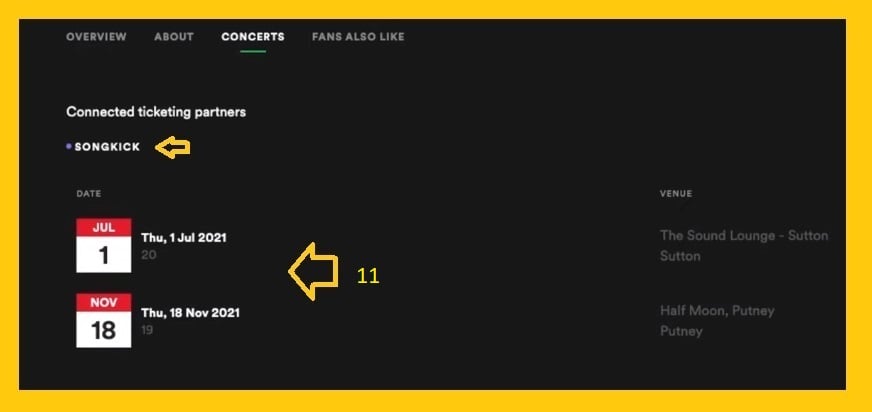
11. You can see your concert info on your profile.
How to Pick Your Concert on Your Profile:
You can also pick your concert on your profile for that you should follow these steps:
In order to add your concert information to your profile more clearly, follow the instructions below;
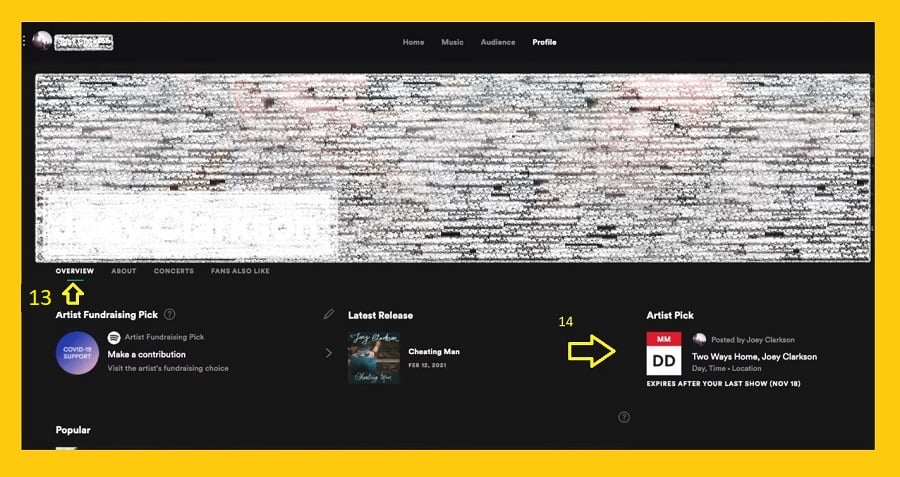
12. on the right side of your screen click on the “TRY ARTIST PICK”.
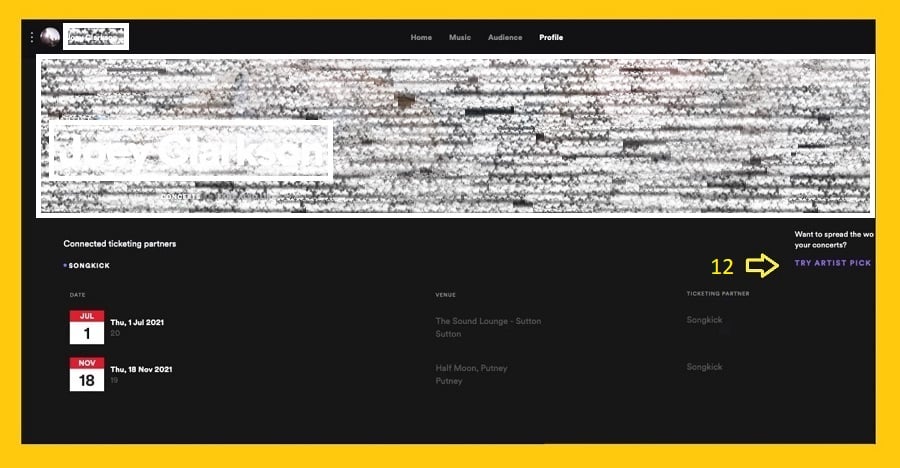
13. Click on the OVERVIEW tab.
14. Now you can see your concert information on your profile.
Merchbar For Spotify Artists
Another feature that Spotify provides for artists is Merchbar.
If you are an artist and you have had an experience of the live show, surely you remember some tables and shelves and showcases were placed in the room which you ran your concert or in the corridor leading to the exit door.
It was possible for your fans to purchase a variety of items on those showcases and shelves.
Spotify used this idea for helping artists, and Spotify activated the Merchbar feature on artist’s profiles.
The Spotify verified artists are able to use this feature today, and they can sell a variety of goods, and their fans can support them by buying their desired goods from their profiles.
The good news for the artist is this feature is completely free of charge and commission-free and all of the profit from that is for artists and company doesn’t receive any money from artists.
For showing off your merch table on Spotify you should:
- Sign up with Merchbar.
- If your merch company or your record label already has a partnership with them, you just have to ask them to make your merchandise available otherwise you should follow these steps:
- Get an Artist link account.
- Add Merch to Spotify.
- Submit for review.
When you list on Merchbar, up to three products will automatically turn out on your artist profile, and if you have more than three items on your merch bar, your artist profile will show the best three products for maximising engagements and sales.
Spotify Artist Playlist
Spotify playlists are another highly effective way for artists to promote their songs.
A Spotify playlist provides fans with insight into what you enjoy, and what inspires you. It also gives your fans an opportunity to better understand your culture and your personality.
- Artists have used playlists in so many different ways over the years to introduce their artwork better, for example, some create playlists regularly, allowing fans to listen to all of their music in one place.
- Artists created playlists from their tours in different countries and by doing so, they give their fans the chance to experience their shows live even if they cannot be there in person. This allows people to connect to your live world via the Spotify platform.
In addition to the tickets and merchandise, you can offer on your artist profile, these tricks can be useful for you as an artist.
Algorithmic and editorial playlists are also effective ways for artists to introduce their work to many people around the world.
How to Send Our Song to Spotify Algorithmic and editorial playlists
You should consider these tips when you want to have your songs on these Spotify playlists:
- You cannot send your songs to those playlists by paying money, but there are still some ways to see your songs on them.
- Send your album as soon as possible after it is ready to Spotify.
When pitching songs, make sure to introduce them properly for Spotify in order to improve the chances of your songs getting picked up and, by that, Spotify can find the people who may like your genre and this kind of music taste easier.
2. If you introduce your songs correctly, it is highly possible that the algorithm after one week delivers your songs to your fans or potential fans.
3. When you see your songs on playlists, share them as much as you can, the more people hear your songs, the more likely they are to place on new playlists and stay on them for a long time, and you will gain more fans.
4. If your songs do not turn up on the playlist after your release them, don’t worry and keep sharing your music. In the future, your music will appear in the Spotify playlist.
In conclusion, don’t underestimate the power of playlists as a way to connect with your fans and potential fans.
Also, by sharing the playlists and your tracks, and by using the methods that we highlighted before, you can see your tracks on Editorial and Algorithmic Spotify playlists, allowing millions of people to listen to your tracks.
How to Pitch Your Music on Spotify Playlists
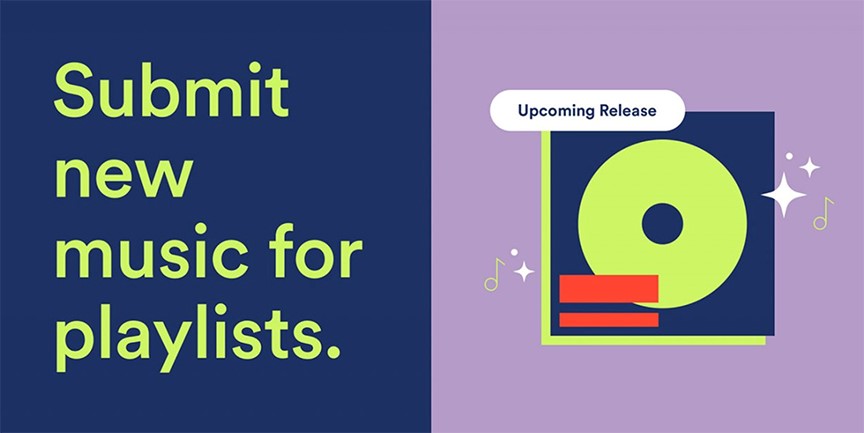
As I explained above, one of the ways to promote your song on Spotify is by pitching it to Spotify’s playlists editors. Here I am going to share my findings on this feature with you. I hope it will help you to get your music on Spotify playlists.
You can pitch a song to a Spotify playlist only if you are an admin or editor. Follow the steps below to get your music on Spotify playlist:
- Launch the Spotify for Artist app.
- Log into your Artist profile.
- Choose a song that has not been released yet to pitch. For that follow one of these two ways:
- At the top of the Home section there is an option named PITCH FROM NEXT RELEASE, select it. Or,
- In the Spotify web platform, go to UPCOMING section and click on the Music to pitch the song you want to Spotify playlist.
5. Select the song you want.
6. Write some information about your music. Try to give complete information about your song to get a higher acceptance chance from Spotify.
After you complete this process, you should wait until you receive an email from Spotify informing you that your music is in the playlist.
Release Music on Spotify
After you get access to Spotify for artists, you can release your music on Spotify. As I was searching about this topic, I figured out that the easiest and fastest way to release your music is by working with a distributor.
The distributor will handle all the work regarding your licensing and whatsoever. The distributor you are working with will also pay the loyalties you earn from your music on Spotify.
The most important thing I understood from my searching about releasing your music via a distributor is choosing the proper one. You need to do some research about different companies and distributors, their method, their contract fee, and other matters before choosing one.
You can use the Spotify preferred distributors, too. Spotify provided a list consisting of some recommended distributors. You can visit their website to get familiar with their work and approach to release your music on Spotify.
You can also work as an independent which means you need to handle the distribution arrangements yourself in order to release your music on Spotify.
How to Upload Music on Spotify
There are two reasons why artists upload music to Spotify
- To release their music online to make money
- To upload their music locally in order to listen to them on their computer, so they can listen to them anywhere.
In order to upload your music to Spotify and other streaming services such as Apple Music, you must use a distributor. You can not upload them yourself.
The reason is that these approved distributors can control the submissions.
Distributors get your data, songs, and ensure that everything is in the right format before uploading it to Spotify.
In the market there are different distributors for uploading your songs, such as Distrokid, Tune Core, and CD Baby. You can select one of them or check the Aristotake blog for the latest news about distributor service.
You need two things when you upload music to Spotify:
CD or single art (at least 1500*1500 pixels). You can use apps like Canva to check that your art is the right size.
2- The music must have at least a 16-bit file format.
A distributor then asks you to fill out the rest of the information that they need, such as who wrote the songs, if you are releasing the music independently or with a label, etc. When you upload your work, you will be asked which streaming services you would like to distribute your music to, you may choose as many as you want, however, we recommend choosing them all to increase your chances of being heard.
There are different distributors in the market here I am going to explain how to use DistroKid to upload your music on Spotify
How to Upload a Song to DistroKid
For uploading songs to the DistroKid website, you should follow these steps:
- Go to the DistroKid website.
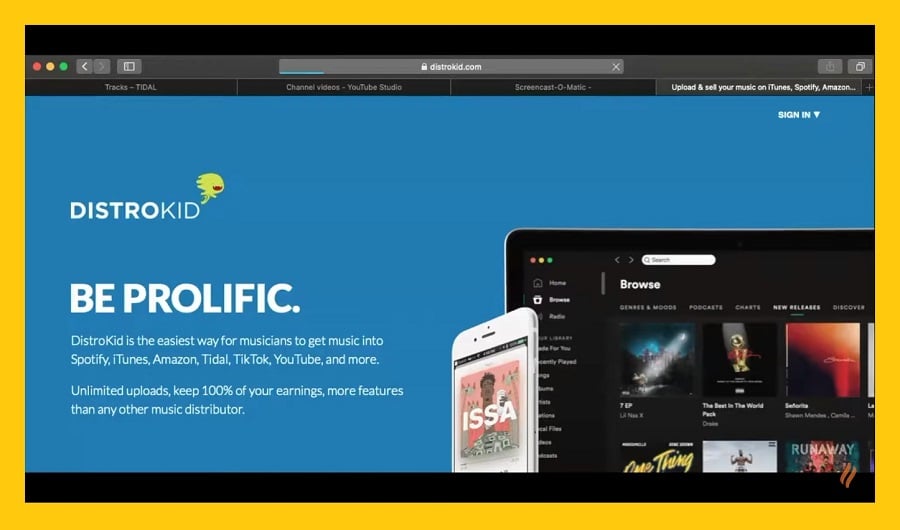
- Click on SIGN IN.
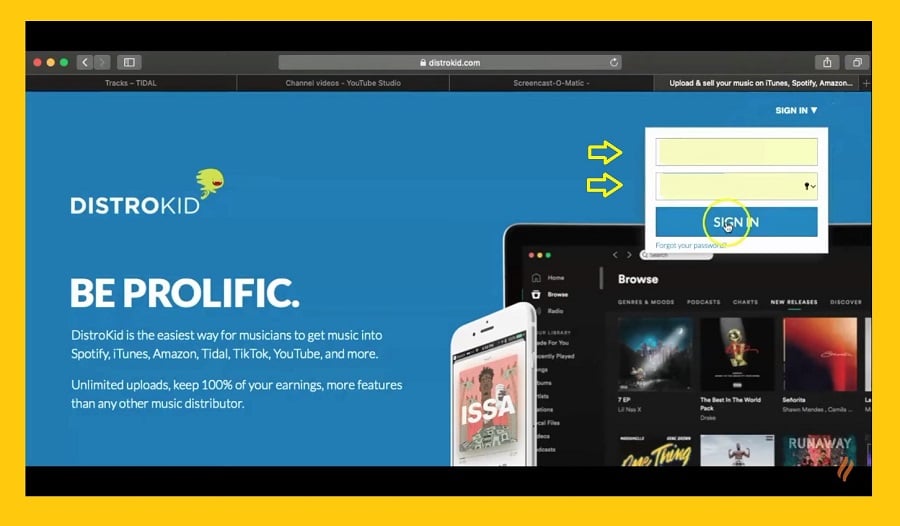
- Enter the code that you will receive from the DistroKid in the 2-step Authentication form.
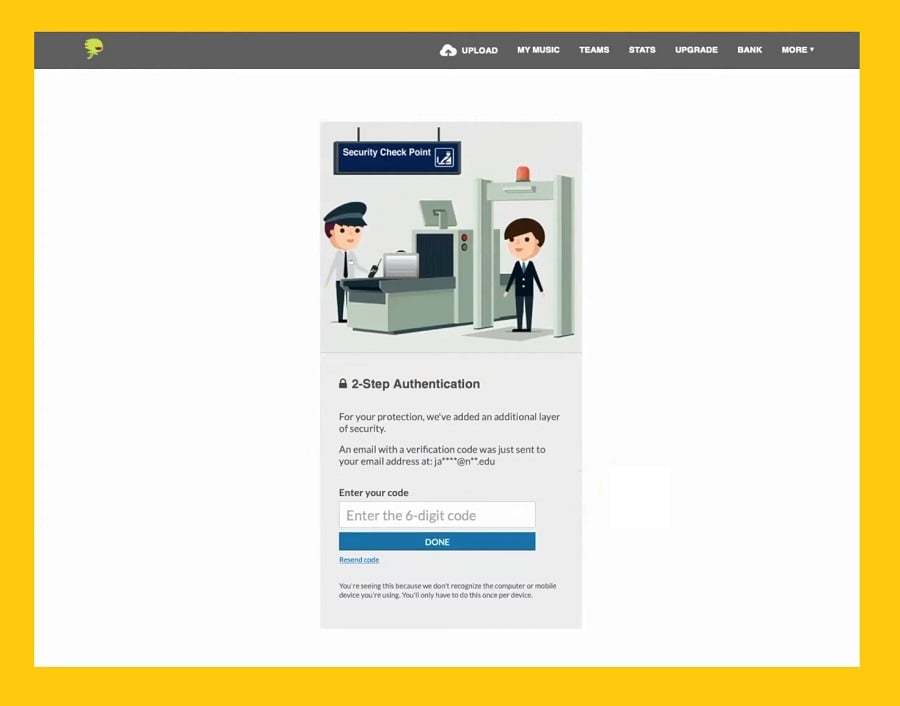
- Click on the Upload.

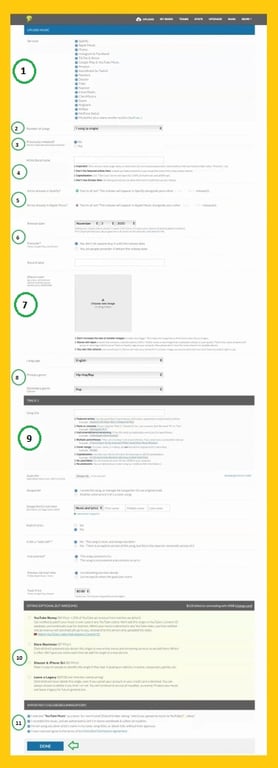
Fill the form below.
- In the Services section selects the stream services that you want to release your songs in it.
- Specify how many songs you want to upload.
- Answer that you previously released the song or not.
- Insert your artist brand name but pay attention to the point that you should consider because some of the stream services may not accept the names that have some character or emojis
- It shows that you are in which stream services now.
- This is where you can enter the release date of your song (remember that it must be at least one week later than the current date.) and also let your fans know that they can preorder your songs or not.
- Upload the cover of your songs.
- Specify the language and genre of your songs.
- Specify the title of tracks and other information about the people who help you to produce this artwork like songwriter and Price and etc.
- Here you can let some stream services to broadcast your artwork, like YouTube and you can receive 20 percent of the ad revenue, or Shazam and Siri to broadcast your songs.
- Check the box you want, it is optional, but do not worry about that choose all of these boxes.
- Click on Done.

- Waite to upload all of your songs.
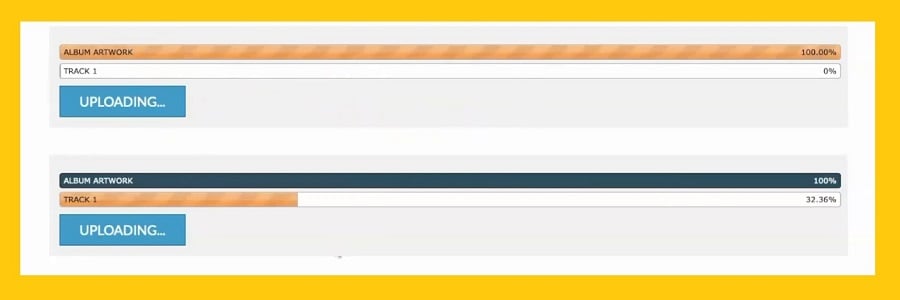
- Here you can see all the songs that you uploaded.
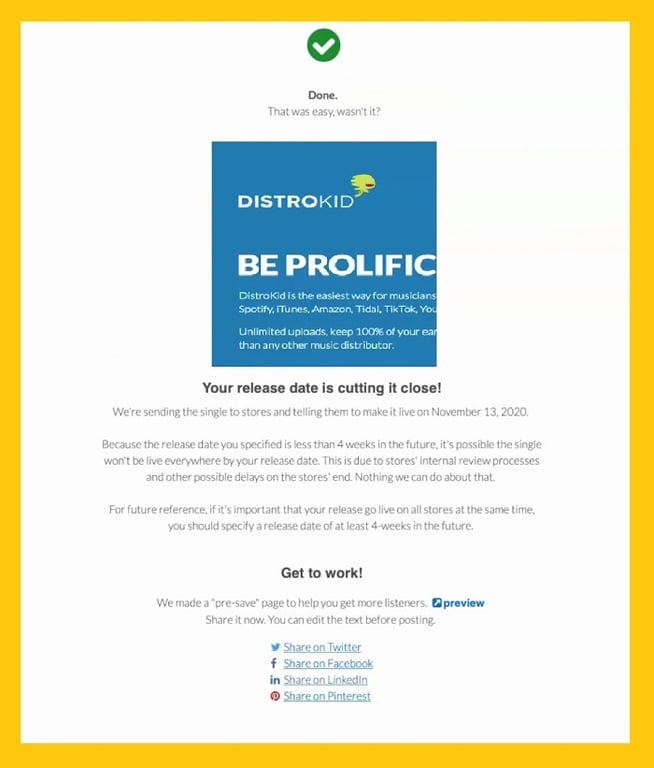
Do Spotify Artists Get Paid
The answer to this question is “yes”.
The number of streams that an artist earns per stream is difficult to determine.
For each stream of music you listen to on platform, company spends some money on the artists who have recorded those songs, but we cannot precisely calculate the amount of money an artist will earn per stream due to various reasons.
- The first reason is that the income that artists receive varies from country to country when one’s streams are listened to, and also whether a user with a Free or Premium account listened to those streams also impacts that artist’s income.
- The second reason is that the payment system in the company works differently and they don’t calculate artist income for each stream.
Stream shares or percentages are used for Spotify payments.
How Spotify Calculate Artist Income
Spotify does not calculate artist income based on the number of streams, rather it calculates it based on the percentage of that artist streams compared to all the streams on Spotify, and the artists will be paid two to three months after their songs are streamed.
As an example, if the number of streams on platform in a day was 1000 streams, and if one artist has 10 streams on that day, he will earn one per cent of company revenue on that day.
However, you should remember that Spotify initially decreased its revenue by 20 per cent for taxes and overheads.
Following that, 30 per cent of the remaining money goes for Spotify profit, and 70% of it will be shared among right-holders and artists.
According to the percentage of the music stream that represents the artist’s music, Spotify divides the money among the artists and rights-holders.
Consequently, we cannot give you a precise number for each stream, but an estimate for artist revenue is approximately 4 USD for every 10,000 streams.
How to Use Streaming Royalty Calculator
You can use the SRC site to estimate the revenue of artists from different kinds of streams apps like Apple, Spotify, Tidal by entering the number of streams an artist has.
For that you should follow these steps:
1- Go to the SRC website. and choose Spotify in the Streaming service part.

2- Insert the number of artist streams that you want to calculate his income from them. here we inserted 1000, now you can estimate the income of the artist by these amount of stream.

3- Click on the “CALCULATE” key to see the income.

Promote Your Music on Spotify
Through my searching about Spotify for artists, I became surprised with the fact that there are over 200 million Spotify users around the world which makes this platform one of the best artists’ opportunities to promote their music.
After searching about using Spotify as an artist, promoting music via Spotify became one of my interesting subjects to search and talk about it with my artist friend. As I understood, Spotify has some plans for artists to promote their music on Spotify.
The first thing I found is that artists can write their biography, descriptions about their music, and change their images on their profile on Spotify which in my opinion, gives the artists the opportunity to promote their music really easy.
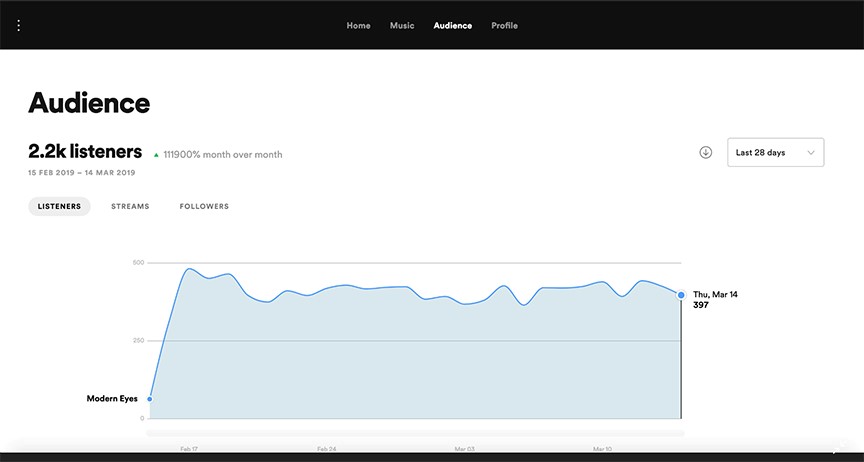
Another option available for artists in Spotify is the listener statistics. I personally think that this feature can be really useful for promoting music on Spotify.
You can analyze the listener stats and then make your decision about your approach for your music promotion on Spotify.
One of the other options to promote a song on Spotify is pitching it to Spotify’s playlists editors. Also, you can share your Spotify profile on different social media platforms such as Facebook, Instagram, and Twitter to let your fans and friends find your music on Spotify.
I think my artist friend will follow this method to promote her music on Spotify.
3 Tips and Tricks to Get More Spotify Streams
As I was searching about Spotify for Artists and its features, I found out that getting streams is an essential matter. The starting point for counting the streams on Spotify is to be streamed for more than thirty seconds.
It means that if you have released a song and it is streamed for more than 30 seconds, Spotify starts counting your streams. If you have more than one song on Spotify, you will also get total streams beside each of your tracks.
There are two kinds of streaming on Spotify, offline and online. The online stream comes into effect of the counting immediately, and the offline streaming will be counted as soon as the user goes online on Spotify.
As I understood from my searching through the web, there are some tips and tricks for getting more streams on Spotify that I will share with you the most effective ones here:
- Make your playlist: By creating your own playlist on Spotify, your presence among the users will be increased. The more your presence increases, the more your streams will be.
- Create your brand image: If you are looking for more streams, you need to work on your brand, not only on Spotify, but in other social media platforms. If you have an especial image, and share it on social media, people will use it as your identification and your streams will increase.
- Share your Spotify link on social network: Social media platforms are really helpful to make a link with your fans, and also find new fans. When you share your Spotify link on different social media platforms, actually you are increasing the chance of getting more streams, so…why are you waiting? Start now!
Use Canvas on Spotify to Be More Creative
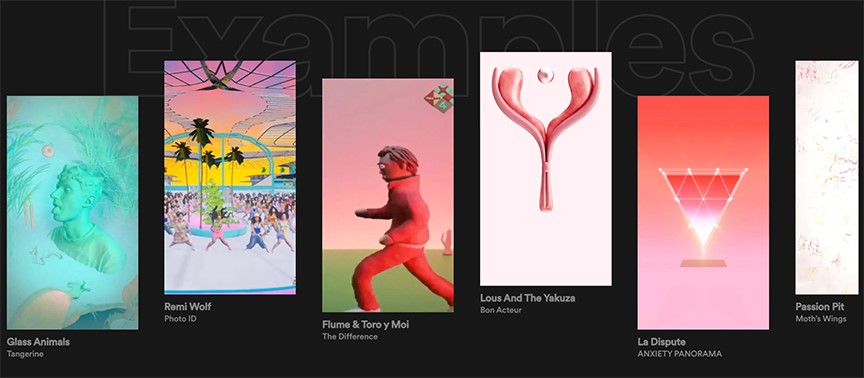
Spotify has added a new feature called Canvas which lets the artists show their creativeness. Canvas is a short and looping video that you can add to your tracks on Spotify. When a user plays your track, instead of an image, the looping video will be shown on their screen.
As a Spotify user, I should be honest, the tracks that have this Canvas feature excite me and make me listen to the track. I mean this feature can help the artists to get more fans and streams on Spotify. I have searched about the Canvas feature on Spotify and I am going to share some of them with you, I hope it helps you to improve your streams on Spotify.
Canvas can be only a 3 to 8 seconds looping video so forget about syncing it with the lyrics of your track. Also, if you make your Canvas clip out of too many rapid cuts, it will be challenging to understand it. So, keep your Canvas video simple and creative.
Creativity is the key point in making Canvas videos. If you can tell the whole story of your song in a 3-8 second Canvas clip, your fans and streams probably will increase.
There is just a gist explanation of the Canvas feature on Spotify. If you want to learn more about this amazing feature I recommend you visit the Spotify Canvas page. You can learn and start making your Canvas there.
Conclusion
For becoming an artist on Spotify and releasing your songs on it, at first you need to sign up as an artist. Then you can use Spotify’s features after proving for company that you are an artist.
After you’ve created your artist account, you can either use Distributors to release your songs or work as an independent artist and handle everything about releasing your songs yourself.
You can use Spotify’s website to find distributors that Spotify recommends. Additionally, Spotify provides different ways in which you can use it to promote your songs, For instance, you can make your own playlist and create your brand image for your song.
Also, you can post your song on my Spotify or share it on different social media platforms.
You may also use Canvas features on the Spotify site to promote your songs; this feature can be useful for artists to promote their music videos.
Here, we attempt to explain some points about becoming an artist on Spotify, if you have any questions related to this, feel free to write them in the comments section below. we will answer it as soon as possible in our next article or by updating this article.
If you find this article useful, then please let your friends know about it. This gives us the energy to produce the next better article.
